Custom Sized Metal Picture Frame Assembly Instructions
Framesbymail.com custom metal picture frame assembly instructions will guide you step by step through the process of assembling your frame quickly and correctly. Whether you are putting together a frame for artwork, photos, posters, or documents, proper assembly ensures a secure fit and a clean, professional presentation. Metal picture frames are designed for easy assembly, and with the right components in place, you can achieve a durable and long-lasting finished frame. Follow the instructions below to assemble your custom-sized metal frame with confidence.
Before You Begin
Before assembling your metal picture frame, make sure you have all components ready, including four picture frame rails, corner brackets (4), tapped plates (4), backing, glazing, and any matting. Assemble your frame on a clean, flat surface to avoid scratching the materials. It is suggested to place a piece of cardboard or a lint-free towel on the surface. The cut edge of the metal frames could scratch the work surface.
Step-by-Step Instructions
Step 1. Select frame bottom and attach the sides.
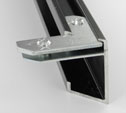
First select the frame rail that will be the bottom of the frame.
Insert 2 corner plates (one without screws underneath one with screws) into each corner and tighten.
Then attach the 2 side rails to the bottom rail by sliding them into the corner hardware and tightening.
Step 2. Insert your artwork and add the top.
Slide the materials to be framed (plexi, mat, backing, artwork, etc.) into the frame channel.
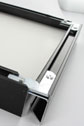
Insert the remaining corner plates into each end of the top rail (just like you did with the bottom rail) and attach to the rest of the frame. Tighten all the screws.
** The plexi has a protective coating on both sides that you must peel off before using it.**
Insert the remaining corner plates into each end of the top rail (just like you did with the bottom rail) and attach to the rest of the frame. Tighten all the screws.
** The plexi has a protective coating on both sides that you must peel off before using it.**
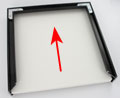
Step 3. Align the corners and insert the spring clips.
Inspect the front of the frame to see that the corners are aligned correctly. Secure your artwork by inserting the spring clips between the frame edge and the backing. When dismantling the frame for any reason, be sure and remove the spring clips before opening the corners.
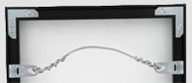
Step 4. Add the wire and hang on the wall.

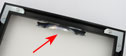
Slide one euro hanger into each of the side rails. Make sure they are evenly spaced from the top rail and tighten the screws.
Loop the wire (not included) twice through both hangers and then twist it to secure it in place. Place the bumper pads on the back bottom corners of the frame, where they meet the wall. Your frame is now ready to hang.
Frequently Asked Questions
- Do Metal Picture Frames require tools to assemble?
- Most metal frames require a screwdriver to secure the corner hardware.
- Can I disassemble and reuse a metal frame?
- Yes, metal picture frames can typically be disassembled and reused if handled carefully.
- What order should frame components be assembled in?
- Plexiglass glazing, a single opening mat or multi-opening mat, artwork, and foam backing should be layered in that order before sealing the frame.
- Do Metal Picture Frames ship assembled?
- No, metal picture frames do not ship assembled since you would need to take the frame apart to insert your artwork.