Custom Sized Wood Picture Frame Assembly Instructions
FramesByMail.com custom wood picture frame assembly instructions will guide you step by step through the process of assembling your frame correctly and securely. Whether you are framing artwork, photos, posters, or documents, our wood frames are designed for straightforward assembly using glue, plastic wedge pieces, and standard mounting hardware. Follow the steps below to assemble your custom-sized wood frame with confidence.
Before You Begin
Before assembling your wood picture frame, make sure you have all components ready: four mitered frame pieces, plastic wedge pieces, wood glue, plexiglass glazing, your artwork, mat board (optional), foam backing, metal mounting brackets, and wire hangers. Assemble on a clean, flat surface. Place a piece of cardboard or a lint-free towel on the surface to protect the frame face from scratches.
Step-by-Step Instructions
Step 1. Assemble the Frame Corners.
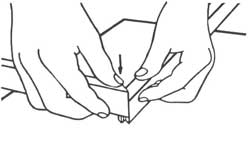
Line up each of the four corner pieces without wedges to the corresponding corners with the plastic wedge pieces. Apply a small amount of wood glue to each mitered corner and then slide the corners together firmly. Allow the glue to set before continuing to the next step.
Step 2. Install the Plexiglass, Mat, Artwork, and Backing.
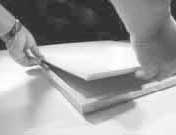
Lay the frame face down on your protected work surface. Place the components into the frame in this order: plexiglass glazing first, then mat board (if using), then your artwork, and finally the foam backing board.
The plexiglass has a white or blue masking on both sides that makes it look like cardboard. Peel this off before placing it in the frame.
Step 3. Install the Mounting Brackets.
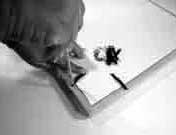
Screw the metal mounting brackets directly into the backside of the frame. Once the bracket is secured with the screw, swivel the undrilled end over the backing board to hold all the contents in place inside the frame.
Step 4. Add the Hanging Wire and Hang on the Wall.

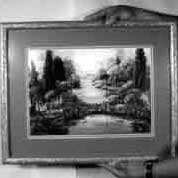
Attach wire hangers on each side of the frame, positioned 1/4 of the total frame height down from the top. Loop the hanging wire (not included) through the first hanger as illustrated, then repeat for the second hanger. Pull the wire taut and twist it back on itself to secure. Your frame is now ready to hang.
Frequently Asked Questions
- Do wood picture frames require tools to assemble?
- Most wood frames require only a screwdriver to attach the mounting brackets. You will also need wood glue for joining the mitered corners.
- Can I disassemble and reuse a wood picture frame?
- Yes, you can reopen a wood picture frame by loosening the mounting brackets on the back. Take care when handling the glued corners to avoid separating them.
- What order should I layer components inside a wood frame?
- Plexiglass glazing, a mat board (optional), your artwork, and foam backing should be layered in that order before securing the mounting brackets.
- Do wood picture frames ship assembled?
- Custom wood frames from FramesByMail may ship partially or fully assembled depending on the style. Wedge-corner frames require final gluing of the mitered corners.